Time Clock sync for DC:
w32tm /config /manualpeerlist:time.nist.gov /reliable:yes /syncfromflags:manual /update
or
w32tm /config /manualpeerlist:us.pool.ntp.org /reliable:yes /syncfromflags:manual /update
Your SUPER-POWERED Solution Site
Time Clock sync for DC:
w32tm /config /manualpeerlist:time.nist.gov /reliable:yes /syncfromflags:manual /update
or
w32tm /config /manualpeerlist:us.pool.ntp.org /reliable:yes /syncfromflags:manual /update
This article will explain the importance and advantages of a guest networks, as well as how to create, configure and manage them.
 |
NOTES & REQUIREMENTS:
In order for the Guest Portal to function, the UniFi Controller itself must be running at all times. Guests are redirected to the Controller to reach the guest portal, and the redirection will not be successful if the controller is not accessible.
|
In many networks public access has become a necessary and valuable feature. From hotels, to airports, to coffee shops, guest networks are fulfilling these needs while minimizing security risks and ensuring quality wireless for permanent users. UniFi empowers administrators with the tools to do everything from monetizing guest WiFi to advanced guest management. This article will explain how to configure a guest network and offer some best practices for managing these networks with UniFi.
Almost every wireless network will need to provide access to both permanent and temporary users. In order to ensure the security and success of the permanent local wireless network, it has become increasingly necessary to separate temporary users in their own network. This offers obvious benefits like not having to remember your network WPA key or having to find a creative way to say no to your neighbor, but also ensures that internal operations and resources are protected from guests who could otherwise exploit your network.
Guest networks offer a number of other advantages:
To help you capitalize on the benefits of this feature, the remainder of this article will explain how to set up a Guest Network and how to configure related settings.
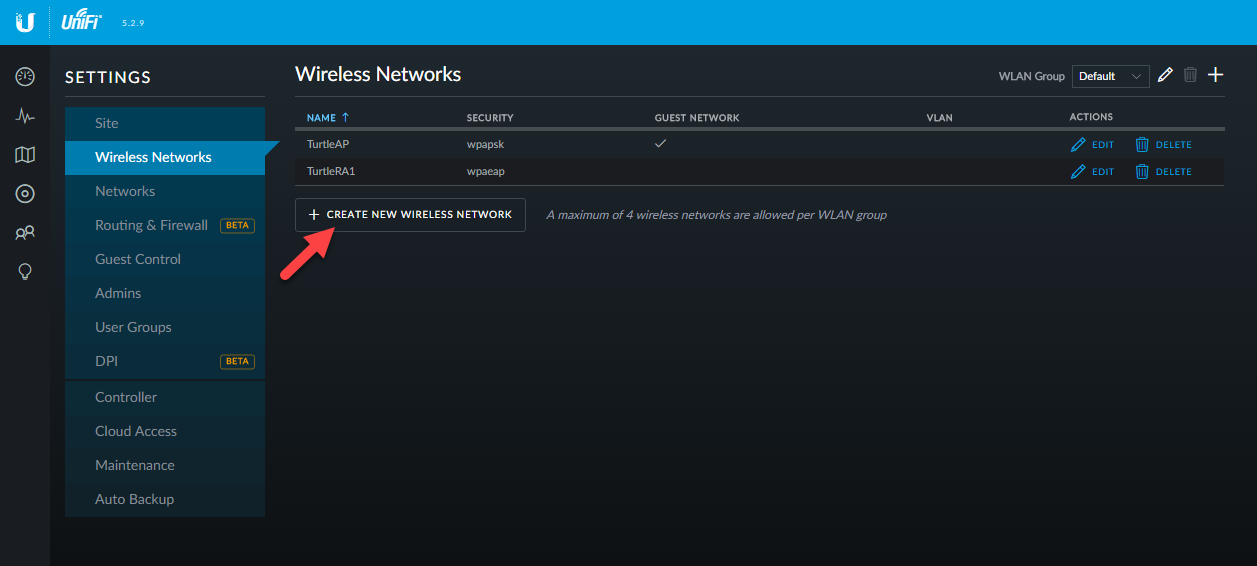
1. Open up your UniFi Controller and go to Settings > Wireless Networks.
2. To create a new guest network, select Create New Wireless Network, otherwise edit an existing network.
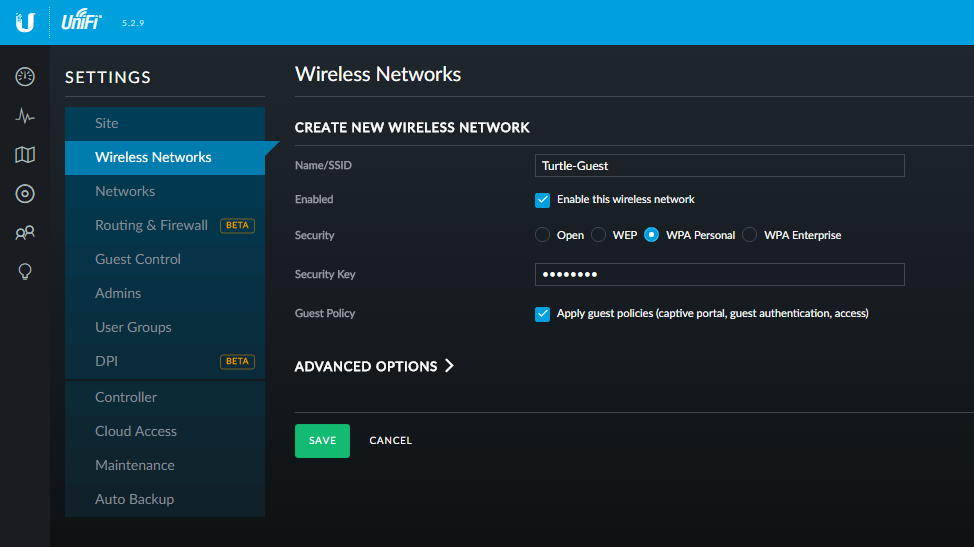
3. Provide a name to designate this network as a guest network.
4. Select the method to be used to authenticate the guest network. A security key may be used, while also leveraging the Guest Portal.
5. To make this new network a Guest Network, check the box “Apply guest policies…”
Next, this article will explain what makes up the Guest Policy associated with this setting, and how to configure these features.
In the UniFi Controller, the Guest Control section is where administrators configure the custom Guest Portal and define what subnets they should and should not be able to access before and after authorization.
To do this:
1. Open the UniFi Controller.
2. Go to Settings > Guest Control.
3. If you want to require guests to interact with the portal click Enable Guest Portal. Doing so will open additional options including the authentication method associated with the Guest Portal, Expiration Term, etc.
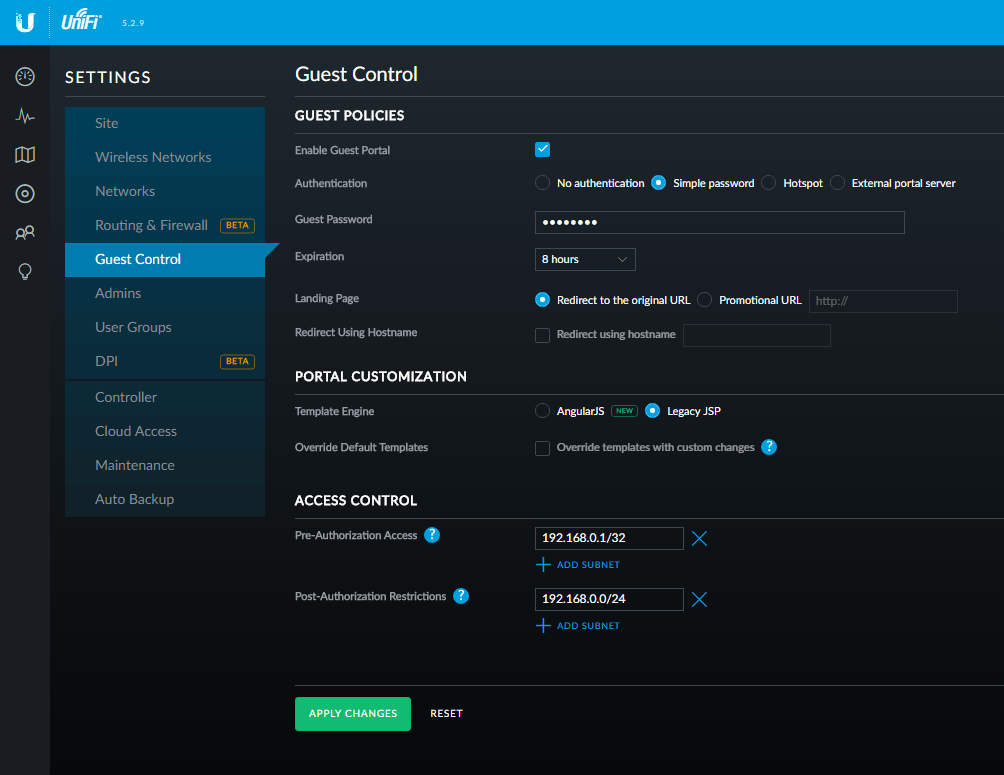
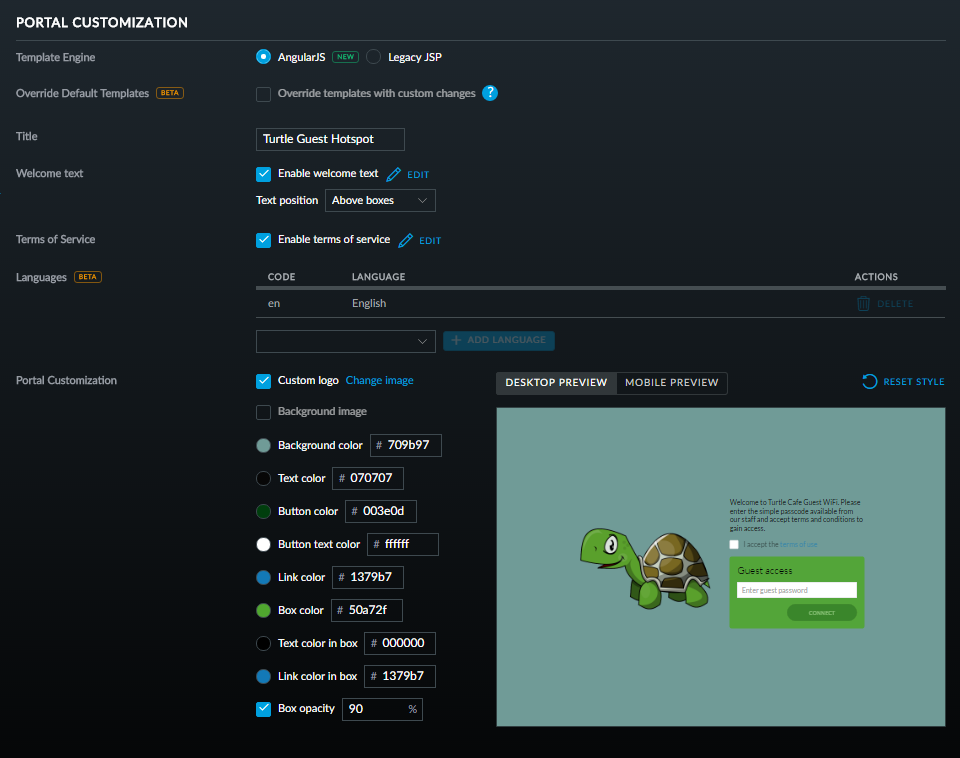
4. Under Portal Customization choose between AngularJS and Legacy JSP. AngularJS allows you to tweak and preview Portal Customization options. Legacy JSP provides you with our classic, simple landing page for guests.
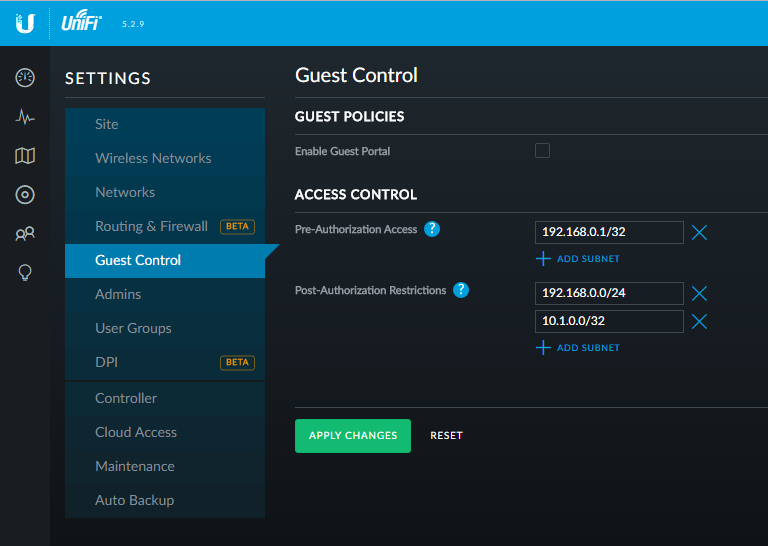
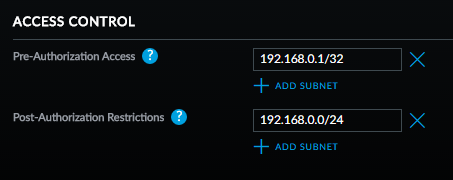
5. Access Control allows you to define subnets necessary for devices to be able to access before and after authorization. An example of a case in which Pre-Authorization Access can be useful is ensuring that devices can access the Guest Portal before being Authorized—to do this, simply define the subnet that contains the Guest Portal IP address. Similarly, if there is a subnet on the internal network you do not wish to allow your guests access to after connecting, you can use the Post-Authorization Restrictions to define these.
In many cases where the Portal is not accessible, not having the Access Control properly configured is often the cause.
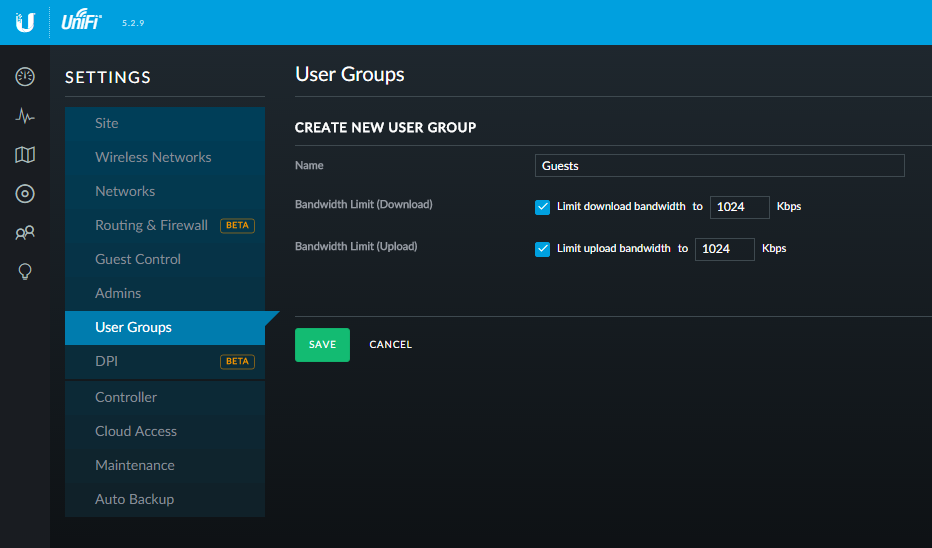
Another useful feature in the UniFi Controller is the ability to limit bandwidth allocation to different user groups. This may be important to ensure guests do not limit the productivity and speed available to permanent users/critical applications. To limit guest bandwidth follow the steps below:
1. Go to Settings > User Groups
2. Create a new User Group.
3. Define the desired bandwidth limit.
Next, to add this group to the Guest Network:
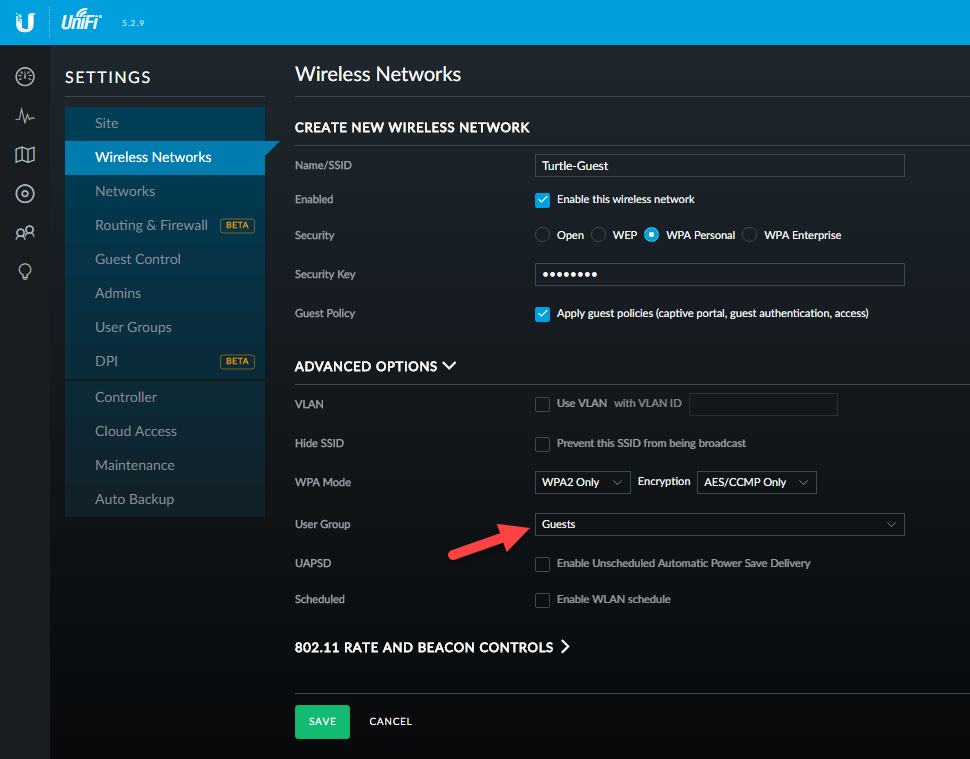
4. Go to Settings > Wireless Networks.
5. Select the corresponding Guest Network and expand Advanced Options
6. Click the dropdown box next to User Group and select the guest user group.
7. Click Save to apply the changes.
Once the Guest Network has been set up, it’s a good idea to test and evaluate function and performance to ensure guests won’t encounter difficulty and demand unnecessary assistance in connecting to WiFi. As you continue to operate your guest network, make sure that your guest network isn’t bogging down your private network. Evaluate security and ensure that the guest network poses minimal security risk. If changes are needed, these settings can be reconfigured and applied at anytime.
Once you have your guest network set up on the WLAN (AP) side—it is necessary to make sure the LAN has sufficient isolation, while also allowing common services which may be required (printers, servers, etc.).
In addition to providing the desired client isolation, LAN-side controls on client isolation reduce/eliminate unnecessary broadcast/multicast data, which if left unchecked will have an adverse impact on installation with around 10 or more WLAN APs (see here for details).
The diagram below shows a generalized layout for network-wide (WLAN and LAN) client isolation, while still allowing network-wide core services.

Here’s how to set this up as shown in the above example in the UniFi controller:

For more advanced configurations related to your guest network see the Related Articles below.
UniFi – Hotspot Portal Customization
UniFi – Managing Broadcast Traffic
UniFi – Viewing Guest Connection Information
UniFi – What happens with the guest portal when the controller goes offline?
This article will explain what broadcast traffic is and why it’s important to manage it in your UniFi-managed network.
Broadcast traffic is a topic of critical importance for network administrators- especially in larger networks. Without managing broadcast and multicast traffic, most networks will likely suffer the consequences sooner or later which can be detrimental to network health.
With UniFi, administrators have a number of methods of both monitoring broadcast/multicast traffic and taking action to prevent the network issues that can come from too much of it. In this article, we’ll explain why broadcast/multicast traffic is an important consideration for network administrators and suggest some methods of managing this traffic.
First let’s define the three fundamental different ways communication occurs over a network- unicast, broadcast and multicast.
Unicast is the most common method used for network transmissions. Unicast involves one device sending info to another single network address. This is the method used most often on networks when users browse the internet or download files from a file server.
Broadcast involves sending a single packet on a network to every possible recipient on the network. This method has its own advantages/disadvantages over unicast and is very efficient. It can however, only extend so far as the broadcast domain—which is usually defined by subnet. Common uses of broadcast transmissions include UniFi device discovery, ARP (Address Resolution Protocol) requests, DHCP, etc.
Multicast functions in a sort of mix between broadcast/unicast. With multicast one device sends data only to systems that are set to receive this data but unlike unicast can send to multiple devices. This means it’s more efficient than unicast while consuming less resources than broadcast. This most commonly occurs on local networks. An example of a common function that uses multicast transmissions is media streaming like a live stream of a sporting event.
Since unicast communication is the most common and essential on most networks—and the least intensive of the three, special precautions will usually need to be taken to ensure that broadcast/multicast requests do not consume so much network resources that they adversely impact network performance. Let’s explore how this happens and how you can identify the symptoms.
Chances are most of us have been on a network when someone plugged in a router or IP phone incorrectly and basically took down the network. The cause of these network outages is most often broadcast/multicast traffic. When a router plugs into the local network incorrectly and starts broadcasting ARP requests in a loop- this consumes such a large amount of bandwidth that there are is quickly no room for normal network operations. This is what we call a broadcast storm.
While many networks will unfortunately experience these from time to time, the less obvious consequences of unmanaged broadcast/multicast traffic often go unnoticed while still severely impacting the network. In such cases, dropped packets, intermittent connectivity issues with APs and slower network speed can tip administrators off.
Let’s take a closer look at how this happens. This is what 400 packets/second of broadcast traffic looks like on a WLAN network with 5 APs:

While 393 kbps isn’t a particularly large amount of data, when sent via broadcast it can consume 80% of airtime. This takes roughly the same amount of airtime as trying to send 639 Mbps (500 packets/second * 123 bytes * 8bytes/bit * 1300 unicast frames/multicast frame) through the AP at full PHY rate.
In the above example, both AP1 and AP4 will likely experience intermittent connectivity issues and dropped packets, which will adversely further affect the performance of other APs. These conditions would result in APs having intermittent connectivity with a maximum of 17 mbps of actual user throughput (unicast data). This would drastically limit the number of users that could connect to each access point—and make the wireless network particularly slow.
As broadcast transmissions increase, this will continue to choke out network function with cascading failures.
For these reasons, it is critical to manage broadcast/multicast traffic. Let’s take a look at how beneficial this can be through another example:

As you can see, with proper control on broadcast/multicast traffic, the same APs can handle over four-fold the user throughput without experiencing any intermittent connectivity. This means the same number of users will all have four times the amount of throughput, or for the same throughput, the system will be able to handle four times the number of users.
In the next section, we’ll explain how this traffic can be managed.
Depending on what tools you have available to you in your network, there are a number of ways to manage broadcast/multicast traffic. With UniFi Switches/hardware, the currently recommended method is using Port Isolation. This method both ensures that broadcast/multicast data is kept to a minimum, while allowing critical services that rely on broadcast/multicast transmissions. Let’s look at an overview of what this would look like:

Here’s how to set this up as shown in the above example in the UniFi controller:
It’s important to note that the LAN-WLAN Broadcast blocking feature does not actually block stations from sending broadcast frames to the AP for forwarding onto the wired network. Instead, it blocks broadcast frames that are destined to the athX interface and avoids them from being transmitted.
The frames are dropped at a wireless driver level. Therefore, if you run a tcpdump on the athX interface of the AP itself, traffic that will wind up being blocked later will appear. The bridge to Ethernet/VLAN forwards everything to the athX interface, which is what tcpdump picks up, completely unaware of which frames the wireless driver will drop afterwards.
This is why verifying the blockage via tcpdump won’t work. You will however, be able to observe by listening on their wireless interface, that once this feature is enabled, broadcast traffic will not be received by any computer connected to that AP, even though you would still be able to see that traffic when running tcpdump -i athX on the AP.
UniFi – Debugging Intermittent Connectivity Issues on your UAP
Overview
Readers will learn how to run the UniFi controller software as a Windows service.
Windows services are often useful since they are “background” applications which don’t require any attention from the end-user. In this way, the service will launch upon startup, without any intervention from the user. The service is a direct replacement/substitute for running the controller program manually (via the icon or a scheduled task), so there is no need to run the controller application if you’re running it as a Windows service.
Table of Contents
Steps – How to Run the Controller as a Windows Service
User Notes & Tips
These notes have been added thanks to user collaboration. Have anything to contribute? Click on the Give Feedback button below!